|
Title |
Description |
| Task 1 -
Can I do the maths? |
These
simple exercises are designed to show you the importance of
learning to use your calculator properly (you may find the
results of your calculations surprising!) and give you an idea
of the slightly higher level of mathematical fluency required at
AS level, through practising the rearrangement of algebraic
formulae. |
| Task
2 - Forming images with visible light. |
Your teacher will show you
a few useful images to demonstrate how light forms images.
Simple images formed in a pinhole camera are considered first,
and then images formed by a convex lens.

Note:
this website shows how you can make a simple pinhole camera
from a digital SLR, and
this website shows how to make a simple pinhole camera which
projects onto tracing paper. |
|
Task 3 - Measuring lens power - practical task |
1. Estimate
the focal length of 2 lenses using the simple method your teacher shows
you (note: this method is only an approximation)
2. Carry out lens practical
according to your teachers instructions:

•
Vary the distance between the object (lamp filament) and the
lens. Measure the corresponding distances from the lens to
the focused image. You must collect at least 6 values!
• Plot
a graph of the curvature of the emerging waves (1/v) on the
y-axis against curvature of the incident waves (1/u) on the
x-axis.
•
Find the intercept with the x-axis or the y-axis
(whichever is easiest!) - this is the lens power in Dioptres.
• Calculate
the focal length of the lens as the reciprocal of the lens
power.
Use this method to find the focal
length / power of at least 2 lenses. |
|
Task 4 - Two ways of looking at light |
Light can be though of as
either rays travelling in straight lines away from a source, or
as wavefronts spreading out in all directions. Read
this document, which has some simple diagrams and
explanations to show you the two ways of thinking about light,
and how this affects our understanding of a lens. |
|
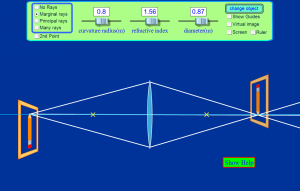
Task 5 - Investigating the principles of a converging lens (ICT) |
Look at
this computer simulation to illustrate the principles of a
simple converging lens. Investigate the scenarios on
this sheet and record your results in your exercise book. |
|
Task 6 - Lens calculations (theory) |
You need to be able to use
the lens equation to solve problems involving the formation of
real images by a thin converging lens. Stick
this sheet with the lens equation and this
sheet
of problems (powerpoint version for teacher
here)
into your book. Your teacher will show you how to do the
first problem as an example. |
|
Task 7 - More lenses problems |
Worksheet - "Q150S
- lenses
cameras and eyes" |
|
Task 8 - Magnification |
Your teacher will explain
how magnification is defined and how it is calculated. You
will want a copy of
this
diagram to stick in your exercise book. |
|
Task 9 - Magnification problems |
This
pdf
document of mixed exam questions has several questions on
magnification. Try question 6 on page 1 and
question 7 on page 5. |
|
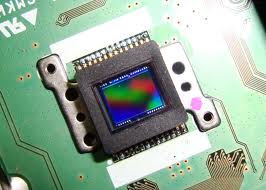
Task 10 - Capturing images with CCD's |
Digital cameras use a
device called a CCD to capture images. You need a basic
understanding of how a CCD works. Your teacher will
explain this to you (powerpoint slide of CCD
here).
Stick in this
diagram
of a CCD and write a simple explanation in your exercise
book.
 |
|
Task 11 - Information theory and the binary counting system |
Getting Used to the Binary Counting System - worksheet
Look at these questions which will give you
practice converting between bits, bytes, kilobytes and
megabytes. |
| Task 11b |
Try
these questions, which look at the amount of data required
to store an image.
Year 12 "images
as pixels" starter questions for subsequent lesson.
Bits and bytes in images -
worksheet (scale down to A5)
How much information in an
image - worksheet (also including data
rates for information transmission). |
|
Task 12a - Resolution |
Look at
these images of a famous politician. What do you
notice about the quality of the images? What effect does
the number of pixels have on the features that can be
identified?

Your teacher will explain to
you what is meant by the resolution of an image, and how
you can calculate the resolution of one of these images. |
|
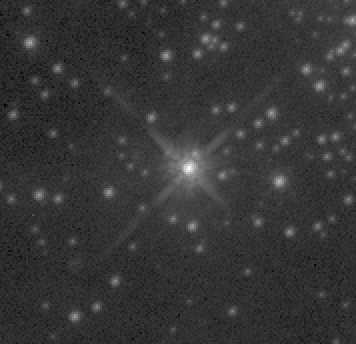
Task 12b - Resolution |
Load each of the files in Scion
Image: 1.Identify a
feature you recognise, estimate its dimensions.
2. Zoom in until you can see
individual pixels
3. Count the pixels comprising
the feature and calculate the 'size' represented by one pixel using the
dimensions you estimated.
File 1
- x-ray of a hand
File
2 - optical image of a star (assume radius to be ~1×10⁶
km)
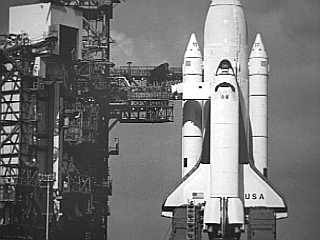
File 3 - flower (scale given)
File 4 - space shuttle (wingspan
~24m) Fill in your answers on
this worksheet. |
| |
Now:
suggested exam question to try - G491
June 2009 Q8 G491 Jan 2009 Q2 |
|
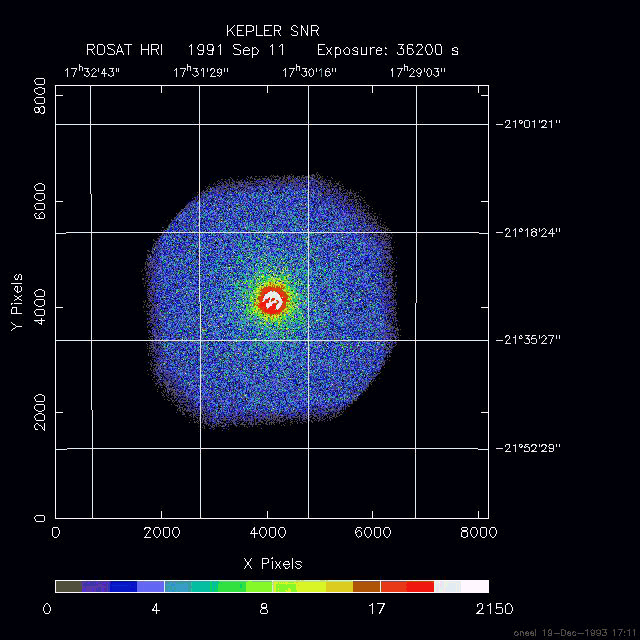
Task 13 - Imaging in X-rays |
We are not limited to
'looking' at objects using just visible light.
This task
requires you to interpret information from an
x-ray image of the Kepler Supernova Remnant. |
|
Task 14a - Image Processing using Scion
Image |
Try
enhancing each of the images below using filters (filters can be
found in the "Process" menu).
File 1 - Mercury with
noise (try removing the noise - rank filter)
File 2 - Space shuttle
(try the edge sharpening filter & this
Laplace kernel)
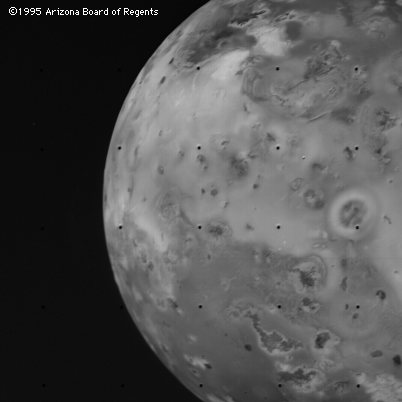
File 3 - Volcanoes on Io
File 4 - Pele Volcano in
UV How could we darken the whole image?
or lighten it? Try using the "add" filter from the
"arithmetic filters" menu. Try adjusting the value of the
parameter from the default. What is this doing to the
pixel values? Now try using the
"multiply" filter. What does this do to the pixel values?
What would be the difference between darkening the image using
the "add" filter and using the "multiply" filter? |
|
Task 14b - Image Processing |
Storing images
electronically allows us to apply a wide range of analysis /
enhancement techniques. This
worksheet will help develop your understanding of
how image processing algorithms work , by directly manipulating
some sample pixel values. You will also need these
spare grids to record your results. |
|
Task 14c - Image processing |
Suggested exam questions:
Jan 2010 Q2 (section A, 2 marks) |
| Task
15 - What is an image |
Starter task -
powerpoint presentation. |
|
Task 16a - Waves for Imaging |
We can
image using a wide
range of different waves - look at
this presentation
to see some examples. You will be using the wave
equation throughout your studies. You met the wave
equation in year 10, so you'll be familiar with it already but
you are going to need more practice using it. Try these questions for homework.
Q10S - speed wavelength and frequency |
|
Task 16b - Ultrasound imaging |
Your teacher will show you
this powerpoint
presentation and explain how ultrasound images are obtained.
When you are happy you understand stick in these diagrams (diagram
1 and
diagram 2) and write an explanation. Include
these terms in your explanation. |
|
Task 16c - Ultrasound measurements of a
pendulum |
Your teacher will show you an "ultrasonic tape measure" and
explain how it works. Now
answer
these questions about a simple ultrasonic position measuring
system, used to track the position of a pendulum against time. |
|
Task 16d - imaging with a Scanning Tunnelling Microscope (STM) |
Look at
this
image, taken with an scanning electron microscope (known as
an STM or SEM). What is the image of? Your teacher
will explain how an STM works. When you are happy you
understand stick in
this diagram, which shows how the STM works, and answer the
questions on
this sheet. You will also need a
high
resolution copy of the image. |
|
Task 17 - Holiday Homework Task
Due
Thursday 8th November 2012 |
Complete these
mixed exam questions (Microsoft Word document). Print
the questions and answer them on the sheet, or answer the
questions on lined paper, or drop into MS14 to pick up a paper copy. |
| |
|
| Imaging summary questions |
Answer
these questions to check you have understood everything you
have learned so far. |
| Key wave terms - a quick reminder |
Your
teacher will help remind you of some key wave terms and
definitions, by creating waves on a rope and a slinky to help
jog your memory! Now,
quickly make a note of the keywords and definitions you need to
accurately describe and explain wave phenomena. You should
also note down the 3 key formulae you will be using.
|
|
Polarisation |
Your teacher will give you
a polarising filter each. Investigate how a polarising
filter affects the glare from several partially reflecting
surfaces. Your teacher will demonstrate
horizontally and vertically polarised waves on a rope, and show
you the how a simple cardboard polarising filter can affect the
waves passing through.
Look at
these
images of polarised waves passing through filters (powerpoint
format). Your teacher will give you copy of both images (image
1 and
image 2) to stick in your book and show you
this applet to help explain how polarising filters work.
Now:
suggested exam question to try - June 2006 Q2 |
.bmp)